Loss of blood is a very dangerous phenomenon that can lead to death in a short time. Without the timely provision of specialized care, the chances of survival with major blood loss are lost every minute. This necessitates the need to have basic first aid skills that can save a person. In this article we will pay attention to venous bleeding, its features, and first aid techniques.
Stopping venous bleeding is one of the most important first aid skills, as damage to large vessels can lead to massive blood loss and death in a matter of minutes.
Specifics and signs of venous bleeding
Specifics and signs of venous bleeding
Veins are a network of vessels that move blood from internal organs to the heart muscle.
Signs of bleeding that occurs due to mechanical damage to the veins are: - dark - brown color of blood (unsaturated with oxygen, unlike cases of arterial bleeding) - smooth, non-pulsating flow - pallor and lethargy of the injured person Venous bleeding can be determined by pressing on the vein near the bleeding wound - with venous bleeding, blood loss will be sharply reduced. Depending on the location of the wound, the nature of first aid varies somewhat, therefore, having identified the source of bleeding, it is necessary to quickly implement an algorithm for providing assistance. Basic rules for providing first aid step by step, ways to stop
NAR Combat Application Tourniquet (CAT)
This tourniquet is a classic version of a tourniquet - a device that is twisted using a lever and allows you to gradually increase pressure on the vessel until bleeding stops.
Tourniquets are considered one of the most effective devices for stopping bleeding and the safest for health. The harness consists of a tape with an adhesive coating, a buckle with a special adapter and the lever itself. Main advantages:
can be applied with one hand;
allows you to gradually increase the pressure on the vessel to the required level.
An analogue of CAT is another type of tourniquet - SOF. The developers assure that the device does not lose its efficiency and performance even in low temperatures, which is quite important for Russia.
Basic rules for providing first aid step by step, ways to stop
Generally accepted actions when venous bleeding is detected are as follows:
- The sections of the vein above and below the injury site must be clamped as close to the bone as possible. To clamp the vein, a tourniquet, thick fabric and similar improvised means are used; in the absence of means, clamping is done with the fingers.
- The wound must be covered with cotton wool or a piece of fabric - this will prevent air bubbles from entering the vein and prevent further development of air embolism.
- If possible, it is necessary to apply ice or any cold object to the wound site that helps slow down the flow of blood circulation.
- Calling an ambulance or any action to hospitalize the victim as quickly as possible. Specific algorithms for providing assistance
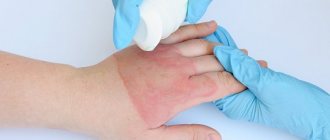
In addition to the general rules for providing assistance with venous bleeding, there are some specific rules that apply depending on the location of the vein damage. Damage to the distal segments located at a distance from the body poses less danger than bleeding from the proximal areas. Measures for bleeding from distal segments (hands and feet, forearm) are as follows: - Pressing the vein with your fingers, in the area below the wound - The damaged limb must be raised above the level of other limbs - The open wound must be clamped with a cotton swab dipped in hydrogen peroxide - If possible, it is necessary to apply a compressive fabric bandage. Measures to stop bleeding from the proximal area (thigh, shoulder): - The damaged area must be elevated - Application of a pressure bandage necessary to reduce the flow of bleeding - Mandatory application of a tourniquet - When visually stopping the bleeding, the tourniquet is removed, the wound is tamponed, and a pressure bandage is applied again.
A way to stop venous bleeding is to apply a tourniquet
First aid for arterial bleeding
The damaged artery must be immediately pressed against the adjacent bone to temporarily stop the bleeding.
Methods of pressing arteries:
- Carotid artery – press your palm to the back of the victim’s neck and press the fingers of the other hand on the artery.
- The brachial artery is easily accessible and must be pressed against the humerus.
- It is quite difficult to stop bleeding from the subclavian artery. To do this, you need to take the victim’s hand back and press the artery located behind the collarbone to the first rib.
- You have to press hard on the axillary artery with your fingers to squeeze it, because it is located quite deep.
- The femoral artery is very large and must be pressed against the femur with a fist. If this is not done, the victim may die within 2-3 minutes.
- The popliteal artery must be pressed into the knee fossa, which does not require much effort.
The location of some arteries on the human body and where they stop
Areas on the human body that supply arteries and places where they need to be compressed during bleeding.
First medical aid for bleeding from the arteries of the extremities is carried out by compressing them, strongly bending the limb and applying a tourniquet. If you cannot squeeze the vessel of the limb with your fingers, you need to bend the limb as much as possible, after first placing a thick gauze roller on the inside of the joint.
If the blood continues to flow, a tourniquet must be applied. It must be provided quickly, since the blood flows out very intensely.
The tourniquet can be held for up to half an hour in winter and up to an hour in summer. If the doctor does not arrive within the specified period of time, you must slowly remove the tourniquet and wait until blood circulation is restored. After that, apply it again. In this case, the pulse on the injured limb should not be palpable. Then the bleeding will stop.
- First aid for arterial bleeding: technique of applying a tourniquet and sterile dressing
We must remember that if used incorrectly, a tourniquet poses a greater danger than the bleeding itself.
If there is no special tourniquet, it can be replaced with materials such as a towel, belt, bandage. They are twisted with a stick and secured to prevent unwinding. Shoelaces, thin rope and similar materials must not be used.
A way to stop venous bleeding is to apply a tourniquet
Half the success of the fight against venous bleeding depends on the correct application of the tourniquet. Therefore, you should know how this measure of medical care is carried out.
- The tourniquet should be applied below the injury site, as close as possible to the wound itself.
- It is necessary to place a piece of bandage or fabric under the applied tourniquet to prevent damage to the skin.
- The tourniquet is applied by quickly wrapping the limb and tightening
- The exposure time of the tourniquet cannot exceed 1.5 hours, therefore, immediately after stopping the bleeding, the victim should be hospitalized as quickly as possible.
Bleeding in the veins of the neck
Bleeding in the veins of the neck
Why is damage to the veins in the neck dangerous?
- Without professional skills, it is impossible to apply a bandage without causing suffocation in the victim;
- vessels in the neck area are large in diameter, their injuries cause profuse and rapid blood loss, so first aid must be provided as quickly as possible;
- Air can be sucked into the lumen of a large vessel, resulting in the formation of an air plug (embolism), which can cause death.
How to stop bleeding if your neck is injured:
- Lay the person down so as to provide easy access to the wound.
- If possible, apply a cotton or gauze cloth folded several times and soaked in antiseptic (hydrogen peroxide) to the wound.
- Press the area above and below the injury with three fingers (ring, middle and index) of both hands folded together.
You can consider that you have achieved results if the bleeding has stopped or greatly weakened, but the pulsation of deep vessels is felt under your fingers.
Nose bleed
Pressure points of arteries
Temporary stopping of arterial bleeding using finger pressure at any location of the damaged vessel, with the exception of the head and neck, is carried out above the wound to the bone along which the artery runs. Points of finger pressure of arteries:
| Localization | Artery | Subjacent bone | External landmarks |
| Above the ear or in the temporal region | Temporal | Temporal | 1 cm above and anterior to the external auditory canal |
| Cheek | Facial | Lower jaw | 2 cm anterior to the angle of the mandible |
| Upper and middle neck, face and submandibular area | General sleepiness | Transverse process of the fourth cervical vertebra (carotid tubercle) | In the middle of the inner edge of the sternocleidomastoid muscle at the level of the upper edge of the thyroid cartilage |
| Shoulder joint, upper third of the shoulder, subclavian and axillary areas | Subclavian | First rib | On the back of the clavicle in the middle third |
| Upper limb | Axillary | Head of humerus | Along the anterior border of hair growth in the armpit |
| Shoulder | Inner surface of the humerus | Along the inner edge of the biceps | |
| Elbow | Upper third of the ulna | On the front surface of the forearm on the side of the 5th finger (little finger) | |
| Radial | In the lower third of the radius | At the pulse detection point | |
| Lower limb | Femoral | Horizontal ramus of the pubis | In the middle of the groin fold |
| Popliteal | Posterior surface of the tibia | At the top of the popliteal fossa | |
| Posterior tibial | Posterior surface of the medial malleolus of the tibia | On the inner surface of the shin | |
| Artery of the dorsum of the foot | Along the anterior surface of the tarsal bones of the foot outward from the extensor of the big toe | Midway between ankles | |
| Pelvic region and iliac arteries | Abdominal aorta | Lumbar spine | Pressing a fist to the left of the navel |
Nose bleed
A strong flow of blood from the nose is stopped in this way:
- the victim must sit down so that blood can flow freely from the nose: tilting his head down slightly;
- to stop the bleeding, you need to clamp the damaged vessels by pressing on the wings of the nose on both sides for 5 minutes (if the cause is not a fracture);
- any cold object is applied to the bridge of the nose: a wet handkerchief, ice, snow;
- if the blood cannot be stopped within 15 minutes, turundas from a rolled-up bandage are inserted into both nostrils;
- It is strictly forbidden to throw back your head, suck in blood through your nose, or swallow it: vomiting may occur.
AGAIN POINT BY POINT
Main causes and symptoms
Capillaries are the smallest vessels, and in normal cases, their superficial damage to the skin does not pose any danger. Stopping the bleeding occurs on its own and does not require special action. The main sign of damaged capillaries is bright red blood. It flows slowly, there is no pulsation. The blood clotting system will work quickly. The vessel contracts, the blood flow slows down and stops due to the formation of a blood clot from platelets and fibrin fibers. Typically the process lasts up to 5 minutes.
Causes of capillary bleeding:
- abrasions, scratches and cuts;
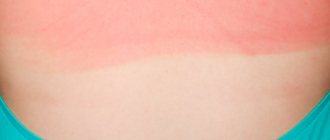
- burns;
- low platelet concentration (thrombocytopenic purpura);
- decreased coagulability (hemophilia);
- pseudohemophilia - increased vascular permeability, causing spontaneous bleeding;
- oncology;
- purulent inflammation of the skin affecting the capillaries;
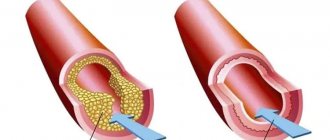
- atherosclerosis;
- hormonal imbalance, etc.
External bleeding is noticeable immediately, but internal bleeding (from the vessels of the stomach, uterus, intestines) is determined by the person’s condition. The main signs are weakness and drowsiness for no particular reason, pale skin, severe thirst, rapid pulse, decreased blood pressure. Sometimes the listed symptoms are accompanied by severe shortness of breath, nausea, fainting and dizziness. If first aid is not provided in time, internal capillary bleeding can be fatal.
AGAIN POINT BY POINT
- It is necessary to find the location of the damage.
- Raise and secure the limb.
- There is no time to clean and disinfect the wound if there is heavy blood loss - it is important to stop it, so ask the victim to press the vein with his hand below the injury site or do it yourself.
- A pressure bandage is applied below the cut or puncture site and can be made from any dressing material that is at hand: a bandage, a piece of clean cotton fabric, a handkerchief.
- Before you start bandaging, you need to place a cloth folded several times below the cut site, this way, when applying a bandage, you will achieve the necessary pressure on the lumen of the damaged vessels to reduce bleeding.
- The bandage should be made several times around the limb, starting from a thinner place. A positive result of first aid for venous bleeding is if the bleeding has stopped and the pulse can be felt below the bandage. This means that you managed to reduce the lumen of the blood vessels, but did not disrupt the blood supply.
- The victim must be taken to the hospital within 2 hours (in winter this period is halved) since an incorrectly applied, too tight bandage can cause tissue necrosis.
When small venous vessels are damaged, spontaneous formation of a blood clot occurs, and the bleeding stops on its own or after applying a pressure bandage. The blood loss in this case is small and is usually not life threatening. However, only a doctor can give a general assessment of the victim’s condition.
In case of damage to medium and large veins (jugular, subclavian and femoral), a favorable prognosis depends on timely assistance. Blood loss in a short time (30 to 50 minutes) can be fatal. A serious complication is the filling of the bed with an air plug (the vein fills with air during inhalation, when negative pressure is formed in it), which can lead to death from embolism earlier than from blood loss.
When providing first aid successfully, you need to remember that it is possible to finally stop bleeding from damaged vessels only in a medical institution.
Bleeding is one of the most common problems that occurs even with minor injuries.
And in theory, everyone seems to know how to provide first aid for bleeding . But when it comes to dealing with real bleeding, panic and tossing begin:
- Is this arterial or venous bleeding?
- Should I apply a tourniquet or a bandage?
- should the tourniquet be applied above or below the wound?
- Should I clean the wound first or later? What to wash with?
- Should I get the glass out of the wound or not?
And while the rescuers are rushing around and doubting, the victim is left without adequate help and continues to lose blood...
The method of stopping bleeding depends 100% on the type of bleeding.
Therefore, the ability to accurately determine the type of bleeding is one of the most important for a rescuer.
You probably know that all bleeding is divided into two main classes: external and internal.
Here we are talking exclusively about first aid for external bleeding, because:
- they are easy to detect, you don’t need to be a doctor
- they happen much more often than internal ones
- almost 100% of external bleeding can be stopped in one way or another by anyone, even without a clear idea of what to do
- the salvation of the victim is highly dependent on whether others can detect and stop life-threatening bleeding right at the scene of the incident
We will not consider first aid for internal bleeding for two reasons:
- internal bleeding is very difficult to diagnose even for a doctor, especially outside a hospital
- even if you somehow diagnosed it, all your first aid for internal bleeding boils down to calling an ambulance and ensuring safety/comfort for the victim while waiting for doctors.
Types of external bleeding
Putting things in order in concepts and definitions
We bet you're expecting to see something like this below:
- First aid for arterial bleeding;
- First aid for venous bleeding;
- First aid for capillary bleeding.
We will disappoint you, this will not happen...
Since this classification, familiar from school, has no practical application in real life, but only brings confusion into the minds of rescuers.
The problem is this...
According to this classification, the logic of first aid looks like this:
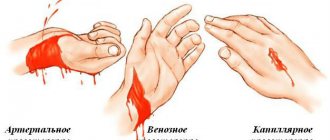
- Arterial bleeding - scarlet blood flows out of the wound in a pulsating fountain - to stop it is necessary to apply a tourniquet above the wound ;
- Venous bleeding - dark cherry blood flows out of the wound in a steady stream - to stop, apply a tourniquet below the wound ;
- Capillary bleeding - dark cherry blood slowly flows drop by drop from the wound - to stop, apply a bandage to the wound.
Types of bleeding according to impractical classification
Everything seems logical...
BUT!!!
The problem is that real bleeding very rarely looks as perfect as in the books. Trying to understand what kind of assistance to provide based on the presence/absence of a fountain and the color of the blood leads to errors in diagnosis and errors in providing first aid for bleeding .
The reality is:
- Arterial bleeding does not look like a fountain in most cases.
You can see the fountain, like in a movie, only:
- In case of injury to superficial arteries (wrist, neck),
- in the first seconds after injury, while the blood pressure in the body is still high.
There will be no fountain:
- if the artery is located deep in the muscles (on the thigh, for example), it will be drowned out by the thickness of the muscles and other tissues
- a minute or two after the injury, when blood pressure dropped due to blood loss.
Thus, in many cases, when an artery is injured, you will not see any “picture” fountain. The blood will flow out in an even stream and look like venous bleeding...
This can lead to an error in diagnosis and choosing the wrong type of help.
- Applying a tourniquet below the wound may have no effect or may increase bleeding.
Without seeing the fountain promised to him, the rescuer may mistake arterial bleeding for venous and, following the recommendations, apply a venous tourniquet below the wound. This will lead to a very unexpected and dangerous effect - instead of stopping, the bleeding continues with the same force! That is, with our correct actions we worsen the condition of the victim. Isn't that great?
- How to distinguish scarlet blood from cherry blood?
To do this, you must have adequate lighting and very extensive experience in observing purely arterial and purely venous bleeding. If you see bleeding for the first time, you will never be able to understand from the color of the blood which vessel it is coming from. For you it will just be red. And if the lighting is not very good (twilight, artificial lighting), then you can completely forget about color differentiation.
Trying to determine the color of the blood in order to understand whether to apply a tourniquet above or below the wound will only lead to loss of time, and therefore to loss of blood to the victim.
- What if both an artery and a vein are damaged (an ax blow to the shin)???
What color should the blood be: scarlet or cherry? Or medium red? So what's now?
Apply the tourniquet from below or from above? Or two at once just in case???
In general, a dead end...
- The temporal artery on the head is bleeding, a clear fountain is visible.
According to the rule, this is arterial bleeding and a tourniquet must be applied above the wound.
Where we will put it:
- higher, on a skull with a hairstyle?
- or below the wound, that is, on the neck???
Okay, I think there are enough arguments and I was able to show the most severe inconsistencies in this approach.
I hope that I have convinced you of its impracticality.
The global medical community, including our Russian one, not only offers, but also widely uses in practice a completely different approach.
It is based not on the type of damaged vessel, but on the intensity of bleeding - the amount of blood that the victim loses per unit of time.
According to this approach, all external bleeding, regardless of the type of vessel, is divided into two types:
- Heavy bleeding
- Light bleeding
Severe bleeding by nature can be arterial, venous, or mixed.
But first aid for bleeding is absolutely the same in any case!!! Either a pressure bandage directly on the wound, or a tourniquet and its analogues above the wound.
A tourniquet is never applied below the wound for any type of injury.
Light bleeding can be either venous or capillary.
But the help is also the same and does not depend on the type of damaged vessel.
How to distinguish heavy bleeding from weak bleeding and how to provide first aid to a bleeding victim - read below in the relevant sections.
For now, just remember that in a real situation there are no arterial, venous or capillary bleedings for you, there are strong and weak ones, and your actions will depend only on this.
Stop bleeding
Procedure at the scene of the incident
Actually, fighting bleeding is by no means the first of the manipulations that you, as a rescuer, need to perform at the scene of an incident.
By being “stuck” on solving problems with blood, you may miss other things that are no less important for the survival of the victim and thereby reduce the chances of success of your actions . Therefore, we will start from the very beginning and analyze the situation from the moment the problem arose.
You find an adult or child with traces of blood on or near him...
Regardless of whether he is conscious (screaming, crying, calling for help) or not (lying quietly and motionless), we act strictly according to the algorithm for providing first aid for bleeding .
So, let's follow the algorithm.
- Step 1
Stop! IS THERE A DANGER?
Stop where you are, do not rush towards the victim!
Assess the scene of the incident for any danger to yourself.
This will take no more than 3 seconds, but it may save your life and you will be able to help the victim.
The danger may be:
- a dog that bit the victim. She might bite you too.
- working power tool (saw, grinder, etc.)
- pieces of broken window glass and mirrors that have not yet fallen
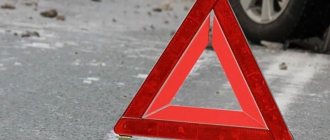
- traffic
- drunk neighbor with a knife, etc.
If you ignore this step and rush to the bloody person without hesitation, you may not notice the danger and become a victim yourself.
And then you will no longer save anyone. You will have to be rescued.
If there is a danger , then forget about bleeding and first do one of two things:
- eliminate the danger (drive away the dog, turn off the tool, etc.);
- evacuate the victim to a safe place.
If there is no danger , then approach the victim and...
- Step 2
Find the source of bleeding (wound) and determine its type:
- strong
- weak
It's very simple and can be done by eye.
If blood comes out of the wound in drops , this is weak bleeding.
If the blood flows in a continuous stream , stream, stream, or pulsates like a fountain, this is severe bleeding.
In general, everything that does not drip, but pours and flows is strong.
Attention, dangerous trap!!!
Don't pay attention to the size and appearance of the wound, just look at the intensity of the bleeding!
The size and shape of the wound can mislead you and you will start making mistakes. The wound can be huge, torn, scary (face bitten by a dog), BUT the bleeding from it is weak.
And vice versa - the wound may be small and not terrible (a cut near the ankle), but blood pours out of it like a bucket.
A large laceration on the face looks terrible and purely emotionally attracts our attention; we want to start doing something to make it not so scary. A small wound on the leg looks trivial, so we forget about it.
As a result, we throw all our resources into fighting a problem that is not life-threatening and forget about a problem that can very quickly lead to serious deterioration and death.
DO NOT fall for this trap!!!
Look at the bleeding and its intensity, not the size and appearance of the wound
Provide first aid for bleeding according to its type
Light bleeding
Does not threaten life and does not require an emergency stop. Even if you don’t provide any help, it will stop on its own within 10 minutes due to the natural formation of blood clots in the wound.
Therefore, instead of stopping bleeding, the fight against infection in the wound comes to the fore.
To prevent possible suppuration and other complications:
- We wash the wound to remove blood clots, dirt and small foreign bodies;
- disinfect inside and around the wound;
- cover with a bandage.
All.
If the wound looks scary, we routinely contact a surgeon for medical help.
Heavy bleeding
This is a direct threat to life and requires an immediate stop!
Otherwise, blood loss will increase every second, and the victim may die.
Attention!
We do not treat a wound with heavy bleeding!!!
Before stopping heavy bleeding, do not waste time on disinfection and washing the wound!!!
While you wash the wound, the victim continues to lose blood.
Doctors at the hospital will clean the wound. You still have to go there.
Your task is to stop the bleeding and give the person a chance to live until this hospital.
Just stop the bleeding.
Stopping severe bleeding
Heavy bleeding can occur only in five parts of our body where there are large vessels:
- Two arms
- two legs
- neck
The head and torso practically do not cause severe external bleeding.
A wound on the head or torso can look very impressive and scary.
But there will not be severe bleeding, since there are simply physically no large superficial vessels on the head and torso, damage to which can lead to severe bleeding.
Heavy bleeding is stopped in two stages.
1. Instant stop with your hands.
First aid for severe bleeding MUST begin with this step
- Instantly stops bleeding and blood loss;
- Does not require a first aid kit or improvised means of assistance;
- Allows rescuers to calmly, without fuss (blood is no longer flowing) to find a first aid kit/available means and also calmly perform a final stop of bleeding with a pressure bandage or tourniquet.
Attention!
If you don’t have a first aid kit and it’s impossible to apply a bandage or tourniquet, you can control the bleeding manually until the doctors arrive. This is fine.
- Applying a pressure bandage or tourniquet (or its analogues).
This is the final solution to the problem, after which you can safely transfer the victim to doctors for surgical treatment.
For this step, you need to have a first aid kit (the best option) or at least some available means (the worst option of the best)
Instantly stop severe bleeding with your hands
There are two techniques for instantly stopping bleeding:
- Hold the bleeding wound with the heel of your palm and lift the limb high, provided that the limb is not broken.
- Compress the main artery in the limb with your fist or knee above the wound.
Compressing the wound with your palm is a quick and reliable method of controlling bleeding. Stopping the bleeding takes a few seconds.
But, unfortunately, its use is very limited.
Restrictions:
- Unavoidable direct contact with someone else's blood
If the victim is your relative, and you are sure that he does not have AIDS, hepatitis A, B, C or Delta, then this is not a problem. Contact with someone else's blood does not cause infection.
But if you do not know the victim... Then using this technique is always potentially risky and is not preferable.
- Nature of injury makes pressure on the wound impossible:
- the wound is very large and you cannot cover it completely with your palm
there are several wounds, and you cannot compress them all at once
- there is a foreign object in the wound and direct pressure is not possible
- a bone sticks out of the wound as a result of an open fracture, pressing is useless and very painful
- the bleeding is caused by the amputation of a limb, there is nothing to put pressure on
In these cases, first aid for a bleeding victim is that instead of squeezing the wound, one must use the technique of clamping the artery that supplies the entire limb.
Compressing an artery with a fist or knee
Bleeding from extremities
This method is guaranteed to work in 100% of cases and allows you to avoid direct contact with the victim’s blood.
The artery is clamped above the wound, on the inner surface of the limb:
- on the arm - on the inner surface of the shoulder as close to the armpit as possible
- on the leg - on the inner thigh as close to the groin as possible
In these places it is easiest to compress the artery.
Your fist is guaranteed to press the only artery to the only bone, and the flow of blood to the wound will stop.
If the pressure from your fist is not enough or you need to free both hands to handle the first aid kit, you can replace your fist with your knee. This is guaranteed to stop the bleeding.
This instantly stops bleeding on the arms and legs.
On the neck this is done a little differently.
Bleeding from the neck
The most severe and dangerous bleeding from the neck occurs when the carotid arteries are damaged. They are located in front on either side of the larynx and trachea.
Complete dissection of even one carotid artery leads to the death of the victim within 30 seconds. Seconds! Not minutes.
If the dissection is not complete, then the time until complete death is a little longer, but still very short. Therefore, we must act with lightning speed.
Bleeding from other parts of the neck is not so dangerous and is stopped in the same way as on the extremities - by direct pressure on the wound.
Example. A cut on the side of the neck, a dissection of the jugular vein. We press the heel of the palm on the wound - and that’s it.
In the area of the carotid arteries, you need to act differently:
Place the tips of all your fingers vertically on the victim’s throat below the level of the wound and move them to the side of the wound. Moving to the side, your fingers will unmistakably fall into the groove between the throat and neck muscles. In this depression, at its very “bottom,” lies the carotid artery. Press firmly with your fingers into the location you find, and you are guaranteed to pinch the damaged vessel. It’s very easy to understand that you did everything correctly - the blood will instantly stop flowing.
Instead of a resume
So, we instantly stopped the heavy bleeding with our hands. Or a knee.
Blood no longer flows from the victim, and we can calmly, without fuss, apply a pressure bandage or tourniquet with its analogues to finally solve the problem.
But before we move on to talking about bandages and tourniquets, let’s look at two important questions that are asked at every training.
Popular questions
- How long to compress the bleeding manually?
It's simple. Hold with your hands until you apply a pressure bandage or tourniquet. If applying a bandage or tourniquet is for some reason impossible or does not produce results, hold it with your hands until the doctors arrive. This is a normal working option. Remember - as soon as you remove your hands or knee, the bleeding will immediately resume.
- Why even squeeze the bleeding with your hands if you can immediately apply a tourniquet?
The point is that in a real situation you cannot apply a tourniquet IMMEDIATELY... You simply don’t have it with you in most cases!!! You have to run after him somewhere, but the blood is flowing...
Hands, unlike a tourniquet, are always there! And squeezing the blood with them is a matter of a few seconds!
And searching for a first aid kit with a tourniquet or inventing one from improvised means takes long minutes. Minutes during which blood will continue to flow from the victim.
Agree that this is absurd! You are already next to the victim, blood is still flowing from him, and you are busy searching and inventing.
Never do this!!! First aid for bleeding is to immediately stop the blood with your hands, and while the bleeding has stopped, get a first aid kit, remove belts, tear T-shirts and whatever else.
Completely stops heavy bleeding.
Pressure bandage or tourniquet, tourniquet, twist?
A pressure bandage and a tourniquet (tourniquet, twist) are two fundamentally different techniques for stopping severe bleeding.
Both have their pros and cons and associated application preferences. It is important to know them in order to understand when to use what.
Pressure bandage
Pressure dressing is the number one technique for permanently stopping severe bleeding, according to the latest medical standards.
The essence of the method
Pressure bandage:
- applied directly to the wound
- blocks only the damaged vessel, without affecting healthy ones.
Thus, it stops bleeding without disrupting the blood supply to the entire limb.
It is the second property that makes the pressure bandage the number one technique, providing it with its main advantages. pros
- It is very effective - it stops up to 90% of severe bleeding, including fountains from the arteries.
- It does not disrupt the blood supply to the entire limb and therefore
- does not give dangerous complications associated with pressure on body tissues and their bleeding
- has no restrictions on the time of application (can be applied for a long period of time, up to a day).
- Can be applied to the neck without suffocating the victim
Minuses
Not applicable, as it will not have any effect if severe bleeding is caused by the following reasons (about 10% of all cases of severe bleeding):
- the wound is very large, it cannot be covered with a pressure bandage;
- multiple wounds (applying several bandages at once is not realistic);
- foreign body in the wound (glass, metal, etc., the pressure on the wound is absurd);
- a bone protrudes from the wound (an open fracture, the pressure on the wound is absurd);
- amputation of a limb (there is nothing to put pressure on).
In these situations, a pressure bandage will not work and you must immediately apply a tourniquet or its analogues.
Tourniquet and its relatives - tourniquet, twist.
All of them are the number two remedy for stopping severe bleeding.
They are used only in desperate situations when a pressure bandage cannot be applied in principle (see list above).
The essence of the method
All of these devices differ fundamentally from a pressure bandage in that:
- applied to the limb above the wound (where there is only one bone - the shoulder or thigh, to ensure that the only artery is pressed against the only bone)
- compresses all vessels in the limbs: both damaged and healthy. And along with them are nerves and other soft tissues, which often leads to serious side effects and complications (see below).
- pros
Their clear and only advantage is their high efficiency - they stop almost 100% of severe bleeding from the extremities.
Minuses
The disadvantages are related to the fact that all these devices completely block the blood supply to the limb and strongly compress the soft tissue at the site of application.
- Cause a number of complications, even if applied correctly:
- nerve damage, sometimes irreversible (paralysis, cuts);
- damage to tendons and muscles.
Mistakes made during application can lead to even more serious consequences, including the loss of a limb.
- The application time is limited to 30 minutes, regardless of the time of year and other factors, according to modern medical standards.
Exceeding this time increases the risk of local complications.
- Not applicable for severe bleeding from the neck.
Yes, a tourniquet is not applied to the neck. Don't be embarrassed that a bunch of articles and pictures on the Internet tell you otherwise.
Practical conclusion from the above
After temporarily stopping heavy bleeding with your hands (fist, knee), always try to stop it permanently using a pressure bandage.
Use the tourniquet and its analogues only if:
- applying a pressure bandage is basically impossible due to the nature of the wound
- for some reason the bandage did not give results
Instead of a conclusion
Let's summarize the most important information from this article.
Having found a person in the blood, follow the algorithm:
- Stop!!! Make sure of your own safety or ensure it.
- Locate the wound and assess bleeding:
Forget about: arterial, venous and capillary!
Bleeding will either:
- Strong – pours in a trickle, stream or fountain
- Weak - dripping from the wound
- Provide assistance according to the type of bleeding
A. Severe bleeding - stop the bleeding quickly, call an ambulance
- instantly with your hands or knee
- then apply a pressure bandage or tourniquet (its analogues), if you have a first aid kit and the skill to use its contents
B. Light bleeding
- wash the wound
- disinfect
- apply a bandage
That's all you need to know to provide adequate first aid for bleeding.